
How to Layer Gravel Substrate for Optimal Plant Growth in Aquariums
Aquatic plants need more than just light and water to thrive. The substrate beneath them plays a huge role in their health. If you use gravel in your aquarium, layering it correctly can make a big difference. Done right, it supports strong root growth, holds nutrients, and keeps your tank looking clean. This guide walks you through everything you need to know about layering gravel substrate for the best plant results.
Why Substrate Layering Matters for Aquarium Plants
Many beginners simply dump gravel into a tank and call it done. However, this approach often leads to weak, struggling plants. Plants need access to nutrients at the root level. A single, uniform layer of plain gravel does not provide that.
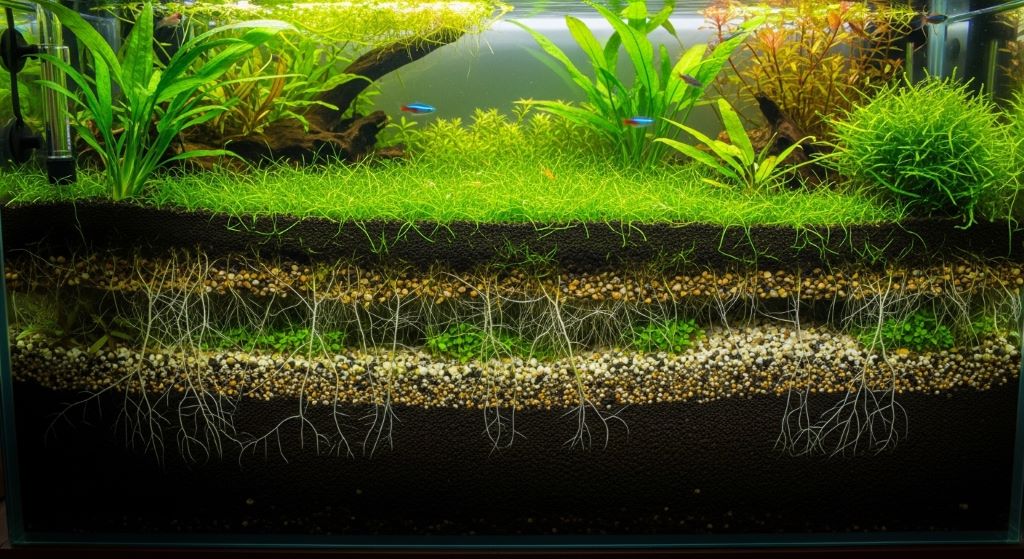
Layering works by placing different materials in specific zones. Each layer serves a purpose. The bottom layer holds nutrients. The middle layer supports root spread. The top layer keeps everything stable and looks natural. Together, they create the conditions plants need to grow strong and healthy.
Additionally, good layering helps maintain water quality. It prevents anaerobic pockets, which are areas without oxygen that can release harmful gases. A well-structured substrate allows water and nutrients to move freely without causing problems.
Choosing the Right Materials for Each Layer
Before you start layering, you need to gather the right materials. Not every type of gravel or additive works the same way. Here is what to consider for each level.
The Bottom Nutrient Layer
The bottom layer is the foundation of your plant substrate system. This is where you place nutrient-rich materials. Common choices include:
- Laterite, a clay-rich soil high in iron
- Commercial aquatic plant soils such as ADA Aqua Soil or Fluval Stratum
- Root tabs mixed into the base material
- Organic compost designed for aquarium use
This layer should be about one to two inches deep. Therefore, do not make it too thick, as excess nutrients can cause algae blooms. The goal is steady, slow nutrient release over time.
The Middle Support Layer
The middle layer acts as a bridge. It separates the nutrient-rich base from the top gravel. Fine sand or a mix of fine and coarse gravel works well here. This layer helps roots move downward without getting stuck. It also prevents the nutrient base from rising into the water column.
Aim for about half an inch to one inch for this layer. Keep it loose enough for roots to pass through easily.
The Top Gravel Layer
The top layer is what you and your fish see every day. Choose smooth, medium-grade gravel for this zone. Sharp or jagged gravel can harm fish and damage plant roots near the surface.
The top gravel layer should be about one to two inches deep. This gives plants an anchor point while still allowing new roots to spread outward. Rinse this gravel well before use to remove dust and debris.
Step-by-Step Guide to Layering Gravel Substrate
Now that you understand the materials, here is how to put it all together. Follow these steps carefully for the best result.
Step 1 — Prepare Your Tank
Start with a clean, empty aquarium. Wipe down the interior glass with a damp cloth. Do not use soap or cleaning products, as even small residues can harm fish and plants. Make sure the tank is sitting level on its stand.
Step 2 — Add the Nutrient Base
Spread your nutrient-rich material evenly across the tank floor. Use your hand or a flat tool to level it out. If you are using root tabs, press them gently into this layer at regular intervals. Space them about six inches apart. This gives plant roots access to nutrients as they grow outward.
Step 3 — Place the Middle Layer
Next, slowly pour the fine sand or mixed gravel over the base. Pour from a low height to avoid disturbing the layer below. Smooth it gently with your fingers. Do not press too hard, as you want to keep each layer distinct.
Step 4 — Add the Top Gravel
Pour the rinsed, medium-grade gravel on top. Again, work slowly and carefully. Slope the gravel slightly higher toward the back of the tank. This creates depth in your aquascape and makes the front look cleaner.
Step 5 — Fill the Tank with Water
Place a clean plate or plastic bag on the substrate before adding water. Pour water gently over the plate. This prevents the force of water from disturbing your carefully placed layers. Remove the plate once water covers the substrate.
Step 6 — Plant Your Aquatic Plants
Wait a day before planting if you used organic-based nutrients. This allows any cloudiness from the substrate to settle. Use aquascaping tweezers to place plants firmly into the top gravel layer. Push the roots down through the layers so they reach the nutrient zone below.
Best Aquarium Plants for a Layered Gravel Setup
Not all plants respond the same way to a layered gravel substrate. Some species prefer fine sand, while others do well in gravel. Here are some top choices for a layered gravel aquarium.
Vallisneria
Vallisneria is a tall, grass-like plant that sends long roots deep into the substrate. It thrives in a layered gravel setup because its roots reach the nutrient base quickly. It grows fast and fills out a tank background beautifully.
Amazon Sword
Amazon Sword plants have an extensive root system. Therefore, they benefit greatly from a deep, nutrient-rich bottom layer. They need room to spread, so place them toward the back or center of the tank.
Cryptocoryne Species
Crypts, as hobbyists often call them, are slow-growing but very rewarding. They are root feeders and do best when nutrients are available directly at the base. A layered gravel setup suits them perfectly.
Java Fern and Anubias
These two plants are an exception. They do not root into the substrate at all. Instead, they attach to rocks and driftwood. However, you can still use them in a layered gravel tank. Simply tie them to decor with fishing line until their roots attach naturally.
Common Mistakes to Avoid
Even experienced hobbyists make errors when setting up their substrate. Knowing these pitfalls in advance saves time and frustration.
One common mistake is using too much of the nutrient base layer. More is not always better. Excess nutrients cause algae to explode in your tank. Stick to the recommended depth of one to two inches.
Another error is skipping the middle layer entirely. Without it, the nutrient base mixes with the top gravel over time. Fish digging in the substrate speed up this process. The middle layer keeps everything in place.
Additionally, many people use gravel that is too fine or too coarse. Very fine gravel can compact and suffocate roots. Very coarse gravel lets debris fall deep into the gaps, making it hard to clean. Medium-grade gravel with rounded edges is the safest choice.
Finally, not rinsing gravel before use is a mistake almost everyone makes at least once. Unrinsed gravel clouds the water badly. It can take days to clear. Always rinse your gravel substrate in a bucket until the water runs completely clear.
Maintaining a Layered Gravel Substrate Over Time
Setting up the layers is only the beginning. Maintenance keeps your substrate working well for years.
Vacuum the top gravel layer during regular water changes. Use a gravel vacuum to suck up waste that settles between the stones. However, avoid pushing the vacuum too deep, as this disturbs the layers below.
Replace root tabs every three to six months. Over time, the nutrients in the base layer get used up. Root tabs replenish the supply and keep your plants growing strong. Press new tabs into the gravel next to the root zones of heavy feeders like Amazon Swords.
Watch for signs of substrate trouble. If your plants turn yellow or stop growing, it may mean the nutrients are depleted. If you notice a rotten egg smell during cleaning, you may have anaerobic pockets forming. Gently stirring the substrate in that area and improving water flow usually solves this.
How Depth Affects Plant Growth
Total substrate depth matters as much as layering. Most aquatic plants need at least three inches of total substrate depth. This gives roots enough room to anchor and spread.
For deep-rooted plants like Amazon Swords and Vallisneria, aim for four to five inches of total depth. Shallower setups work for smaller plants like dwarf hairgrass or Cryptocoryne parva.
Therefore, plan your depth based on the plants you want to keep. Think about your plant list before you build your substrate system.
Conclusion
Layering gravel substrate is one of the most effective things you can do for your aquarium plants. It provides nutrients at the root level, supports healthy root spread, and keeps your tank stable over time. By using a nutrient-rich base, a supportive middle layer, and clean top gravel, you create the perfect environment for plants to thrive.
Remember to choose your materials carefully, follow each step slowly, and maintain the substrate regularly. Avoid common mistakes like skipping layers or using too many nutrients at once. With patience and the right setup, your planted aquarium will reward you with lush, vibrant growth that looks stunning for years to come.
Frequently Asked Questions
1. How deep should a gravel substrate be for a planted aquarium?
A minimum of three inches is recommended for most planted tanks. Deep-rooted plants like Amazon Swords do better with four to five inches of total substrate depth to allow full root expansion.
2. Can I use regular aquarium gravel without adding a nutrient layer?
Yes, but your plants may grow slowly or struggle over time. Plain gravel holds almost no nutrients. Adding a nutrient-rich base layer or regular root tabs significantly improves plant health and growth rates.
3. How often should I replace the nutrient base in my substrate?
You do not need to replace the entire base often. Most commercial aquatic soils last one to three years. After that, supplement with root tabs every three to six months to maintain nutrient levels for your plants.
4. Will layering gravel disturb my fish?
No, a properly layered substrate is perfectly safe for fish. Use smooth, medium-grade gravel on top to protect fish that dig or bottom-feed. Avoid sharp or jagged gravel that can injure fish near the substrate.
5. Can I add plants immediately after setting up a layered gravel substrate?
It depends on your base layer. If you used commercial aquatic soil, you can plant right away. If you used organic compost or fertilizer, wait 24 to 48 hours for the substrate to settle and any cloudiness to clear before adding plants and fish.
Related Topics:
How to Use Aquarium Glue Safely for Plants and Decorations
How to Choose Aquarium Plant Fertilizer in Washington for Healthy Growth